Creating a book recommendation engine using Google Apps Script
Don’t have time to get to all your library duties? Need more staff? Create them using code! I work in a school library and could definitely do with some help around here, so let’s write some programs to streamline a few library duties and add some “virtual staff”.
In this post, we’ll create a small tool to help get word out to the school community about book recommendations and new releases/purchases in the library. The plan is to make use of a Google Sheet to pre-populate a bunch of data as time goes on and then have a Google Apps Script pull that data periodically, display it on our digital displays using Google Slides as well as to send email updates to the community.
The first thing to do is to create a new folder in Google Drive. We do this primarily to have a place for the images we’ll be using - we want to store book covers in a place that we can pull from. Let’s also create a new spreadsheet and a new Slides document.

Our Google Drive folder has a Slides document and a Sheets document as well as a folder to store images
Once we’ve done that, let’s start with the Google Sheets spreadsheet. We’ll create a spreadsheet with the following fields: Type, Date, Title, Author, Audiobook URL, Ebook URL, Image, Description Short, Description Long, Completed

The spreadsheet we’ll use with an example entry
Type: Allows us to control what we do with the recommendation and how we format the display
Date: When we want to send out the recommendation
Title: Title of the book
Author: Author of the book
Audiobook URL: Link to the audiobook if we have it available
Ebook URL: Link to the ebook URL if we have it available
Image: Link to the image stored in our Google Drive Folder
Description Short: The description we’ll use when recommending the book
Description Long: A longer version of the description we can use when possible
Completed: Whether this book has been recommended by us
Now that we have the spreadsheet, but before we jump into any code, let’s create a template that we’ll use in our presentation.
In your Slides document, click on “View” > “Master” and it’ll open up the Master template that is used when creating new slides. Go to the last slide and add a new one. I’ve gone ahead and created this one.
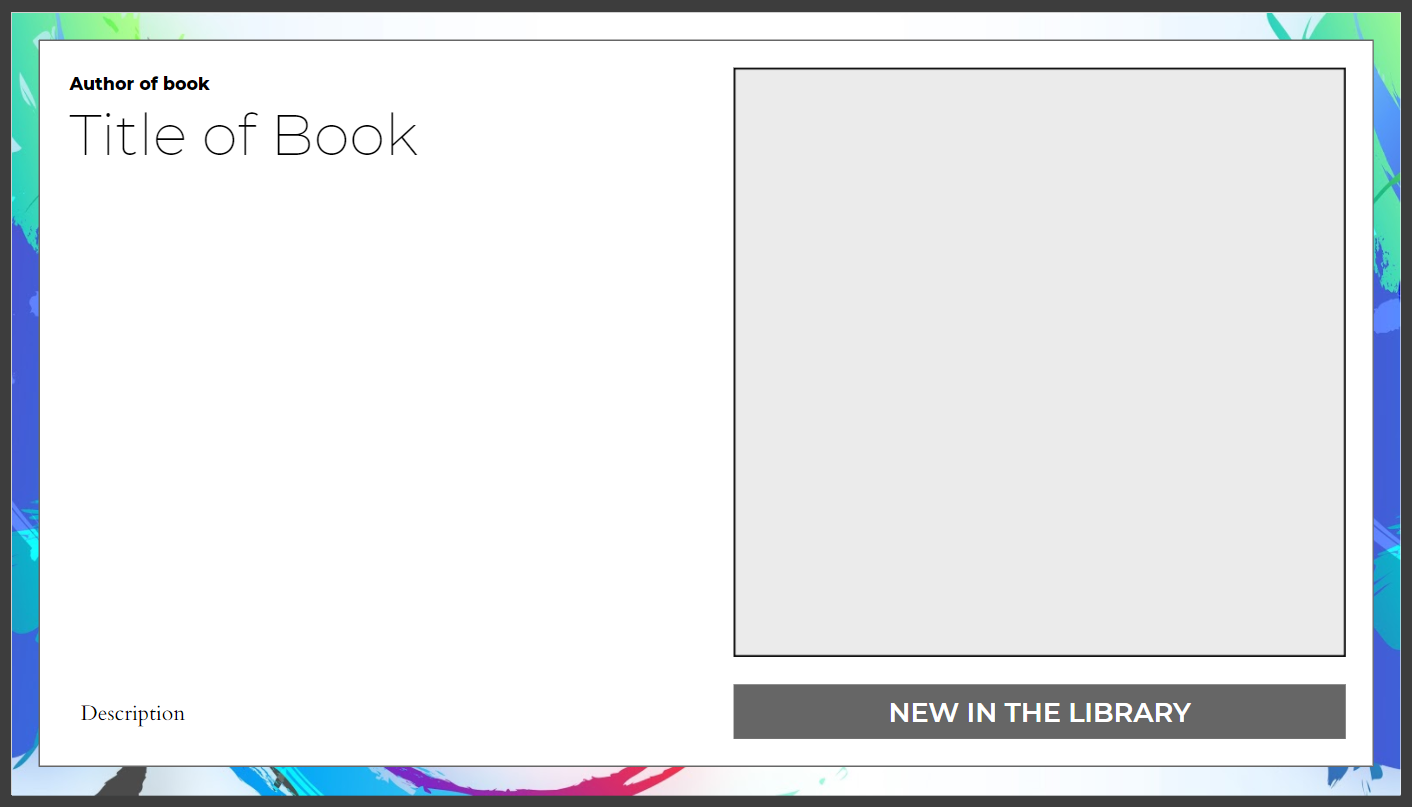
The layout we’ll use when creating new recommendation slides. We have text fields for “Author”, “Title”, “Description” and a placeholder image, which we can replace with book cover images found in our Drive folder.
Right! Now we can go ahead and open the Google Apps Script editor, where we’ll write the code needed to run our program. In the spreadsheet, click on “Tools” > “Script Editor”. I’ll paste the full code first and then break it down below.
01. function process() {
02.
03.   // Get a reference to our spreadsheet. Using the Id provides greater flexibility in terms of where you can run this code
04.   var spreadSheet = SpreadsheetApp.openById("1OCaMZBlntm3p9s74gnjYzZmjDauy5FaCPsj4qgBSwxw");
05.
06.   // Get a reference to the specific sheet we are using. I've called it "Book List"
07.   var sheet = spreadSheet.getSheetByName("Book List");
08.
09.   // Get the next valid entry to recommend. Details about that function below
10.   var entry = getNextEntry(sheet);
11.
12.   // If there is no valid entry, we exit the script
13.   if (!entry)
14.     return;
15.
16.   // Get a reference to the presentation we'll update
17.   var presentation = SlidesApp.openById("1eE7FOijVm1VcDXMCVXXyn1cuVGWNvH5c5UHMNXlAF6w");
18.
19.   // We'll use a master layout in our presentation. This allows us to create a template that will be reused whenever we add a new entry.
20.   // Naming seems a bit strange in Google Slides master documents, so the custom slide you create is called "CUSTOM" even if you call it something else.
21.   var layouts = presentation.getLayouts();
22.   for (var i = 0; i < layouts.length; i++) {
23.     var layout = layouts[i];
24.     if (layout.getLayoutName() == "CUSTOM") {
25.       // With the correct layout, we can add the slide. Details about this function below.
26.       addSlide(presentation, layout, entry);
27.
28.       // Set the "Completed" column value in our row so that we don't use this entry again
29.       var vals = entry.range.getValues()[0];
30.       vals[9] = "completed";
31.       entry.range.setValues([vals]);
32.       break;
33.     }
34.   }
35. }
36.
37. // Given our range, we go through our rows and find the next entry we'd like to recommend. This is based on date and whether we've used this one before
38. function getNextEntry(sheet) {
39.   Logger.log("Getting next entry");
40.
41.   var rowIndex = 2; // We start on row 2, as we don't want the header row
42.   var range = sheet.getRange(rowIndex++, 1, 1, 10);
43.   while (!range.isBlank()) {
44.     var vals = range.getValues()[0];// We only need to access the first element in the returned array
45.
46.     var date = vals[1]; // "Date" column
47.     var completed = vals[9]; // "Completed" column
48.
49.     if (date.toDateString() == new Date().toDateString() && !completed) {
50.       // return an object so we have named references
51.       return {
52.         type: vals[0],
53.         title: vals[2],
54.         author: vals[3],
55.         audiobook: vals[4],
56.         ebook: vals[5],
57.         image: vals[6],
58.         descriptionShort: vals[7],
59.         descriptionLong: vals[8],
60.         range: range // add a reference to the range so we can update it
61.       };
62.     }
63.
64.     range = sheet.getRange(rowIndex++, 1, 1, 10);
65.   }
66. }
67.
68. // This function actually adds a slide to our presentation, given the data of our entry
69. function addSlide(presentation, layout, entry) {
70.   Logger.log("Adding Slide");
71.   var slide = presentation.appendSlide();
72.   var pEls = layout.getPageElements();
73.
74.   // We've grabbed the page elements from the layout, which we'll add to our newly created slide
75.   // To know which element we're accessing, I've hacked it a little bit by adding "alt" text titles to the elements,
76.   // which allows us to know which elements we're accessing
77.   for (var i = 0; i < pEls.length; i++) {
78.     var el = slide.insertPageElement(pEls[i]);
79.     switch (el.getTitle()) {
80.       case "title":
81.         el.asShape().getText().setText(entry.title);
82.         break;
83.       case "author":
84.         el.asShape().getText().setText(entry.author);
85.         break;
86.       case "description":
87.         el.asShape().getText().setText(entry.descriptionShort);
88.         break;
89.       case "image":
90.         // Adding an image from Drive is kind of a hassle as there's no publicly accessible URL, so we find the image, get its Blob and replace the placeholder image with that
91.         var files = DriveApp.getFolderById("1F9iJL23Rs16n8PJSwgTP32jJjw4NWz1q").getFilesByName(entry.image);
92.         if (files.hasNext()) {
93.           el.asImage().replace(files.next().getBlob());
94.         }
95.         break;
96.     }
97.   }
98. }
99.
The code is pretty well documented, so the intention should be quite clear, but let’s look at some important bits:
We have 3 main functions: one to process them all, one to get the data, and one to add the slide. We can add the “process” function to an automated Trigger that runs, for example, once a day. That way, you just need to keep the spreadsheet updated and the rest will be done automatically. The getNextEntry function currently returns the first row of information that both matches today’s date (for future planning) and has not already been processed. This does mean that, in its current state, you’ll need to run the script multiple times per day if you have multiple entries on a single day, but that should be an easy modification or update to the Trigger. Finally, the addSlide function uses the information and adds a new slide based on a predefined layout.
Now, we just keep our spreadsheet up to date, and we can run the script whenever we need to add a slide to the presentation. Display the presentation wherever you need and it will be kept updated (provided you open it up fresh each day).
A last point: you may notice that we haven’t used some of the fields in the spreadsheet, such as “Type”, “Audiobook URL” and “Ebook URL”. These will be useful when we connect the script to other services, such as Gmail, so that it automatically sends out an email as well as creating a new slide.
Pro tips:
Create a form on your digital learning commons for students and staff to fill in their recommendations. That way, you can have the Spreadsheet get populated by other people.
Connect the script to Twitter so it tweets the updates at the same time.
Add a few layout templates and choose randomly from them when adding the slides